ESP8266 ESP-01 Firmware Update
Update ESP8266 ESP-01 to new firmware for my home automation project, initially the module was working perfect to you.
Step 1: Parts List
- Arduino UNO
- ESP8266 ESP-01
Step 2: Download ESP8266 Flasher and ESP8266 Firmware
Download ESP8266 flasher from this link
ESP8266_Flasher
Download ESP8266 Firmware from this link
AI-v0.9.5.0 AT Firmware.bin
Step 3: Connecting ESP8266 to Flash mode
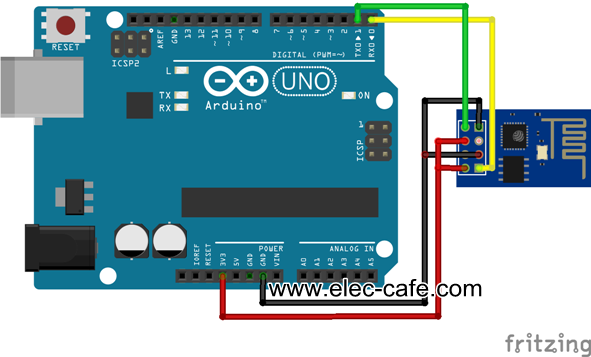
ESP8266 <-> Arduino UNO
- Tx <-> Tx (D1)
- Rx <-> Rx (D0)
- VCC <-> 3.3v
- GND <-> GND
- CH_PD <-> 3.3v
- GPIO0 <-> GND (Connect into flashing mode, disconnect after finish)
** Connect ESP8266 RX to Arduino UNO Rx and ESP8266 TX to Arduino UNO TX **
Step 4: ESP8266 to Boot Mode
Upload Blink example code to Arduino UNO
// the setup function runs once when you press reset or power the board
void setup() {
// initialize digital pin 13 as an output.
pinMode(13, OUTPUT);
}

// the loop function runs over and over again forever
void loop() {
digitalWrite(13, HIGH);   // turn the LED on (HIGH is the voltage level)
delay(1000);              // wait for a second
digitalWrite(13, LOW);    // turn the LED off by making the voltage LOW
delay(1000);              // wait for a second
}
** if you can’t run upload , please remove TX and RX and then connect after finish **
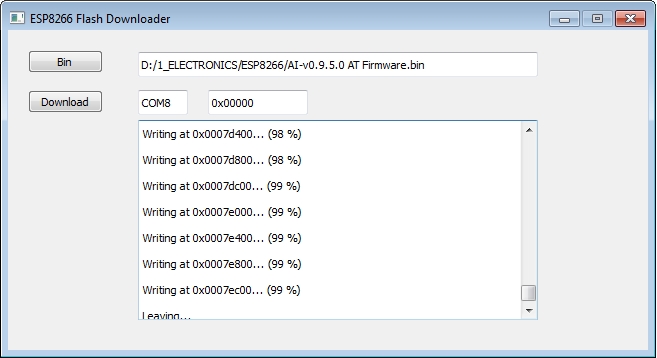
Step 5: Uploading Firmware
Browse the bin file or firmware version files
Set you COM Port –> (view Device Manager> Ports(COM&LPT))
Click Download button
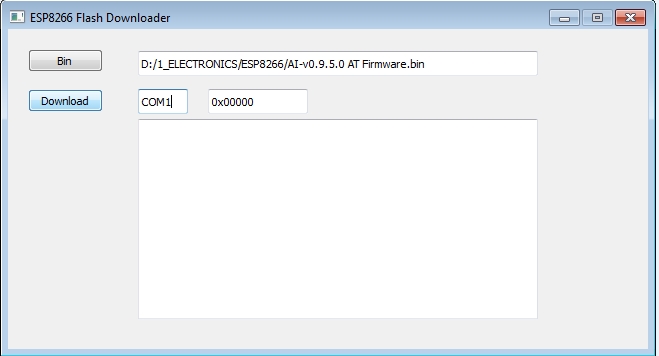
Complete update firmware
** In the end at 99% it will show some error but this is ok.
Test AT commands in Arduino Serial Monitor
Set Both NL & CR
Set Baudrate at 9600
Enter “AT” and you will get “OK”.
Enter “AT+GMR” and check the firmware version.