ESP8266 Temperature / Humidity Webserver with a DHT11 sensor
The ESP8266 ESP-01 is used as a WEB Server to Display Temperature and Humidity information from the DHT11 sensor.
Step 1: Parts List
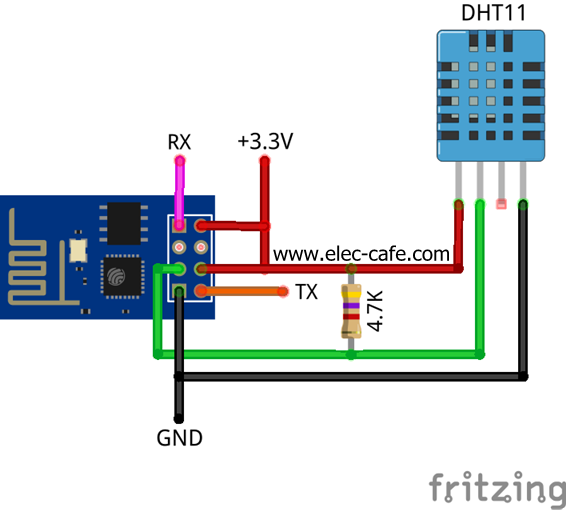
- ESP8266 ESP-01
- DHT11 Temperature and Humidity Sensor
- 4.7k resistor

Step 2: ESP8266 + DHT11 Sensor Wiring
Step 3: Upload Code to ESP8266
** Change “ssid” and “password” to your wifi network **
Compile and upload code to ESP8266.
#include <ESP8266WiFi.h>
#include <DHT11.h>

const char* ssid     = "ssid"; // Your ssid
const char* password = "password"; // Your Password

int pin = 2;

WiFiServer server(80);
DHT11 dht11(pin);

double Fahrenheit(double celsius) {
return ((double)(9 / 5) * celsius) + 32;
}

double Kelvin(double celsius) {
return celsius + 273.15;
}

void setup() {
Serial.begin(115200);
delay(10);
Serial.println();

// Connect to WiFi network
WiFi.mode(WIFI_STA);
Serial.println();
Serial.println();
Serial.print("Connecting to ");
Serial.println(ssid);

WiFi.begin(ssid, password);

while (WiFi.status() != WL_CONNECTED) {
delay(500);
Serial.print(".");
}
Serial.println("");
Serial.println("WiFi connected");

// Start the server
server.begin();
Serial.println("Server started");

// Print the IP address
Serial.println(WiFi.localIP());
}

void loop() {
int err;
float temp, humi;
if ((err = dht11.read(humi, temp)) == 0)
{
Serial.print("temperature:");
Serial.print(temp);
Serial.print(" humidity:");
Serial.print(humi);
Serial.println();
}
else
{
Serial.println();
Serial.print("Error No :");
Serial.print(err);
Serial.println();
}
WiFiClient client = server.available();
client.println("HTTP/1.1 200 OK");
client.println("Content-Type: text/html");
client.println("Connection: close");  // the connection will be closed after completion of the response
client.println("Refresh: 5");  // refresh the page automatically every 5 sec
client.println();
client.println("<!DOCTYPE html>");
client.println("<html xmlns='http://www.w3.org/1999/xhtml'>");
client.println("<head>\n<meta charset='UTF-8'>");
client.println("<title>ESP8266 Temperature & Humidity DHT11 Sensor</title>");
client.println("</head>\n<body>");
client.println("<H2>ESP8266 & DHT11 Sensor</H2>");
client.println("<H3>Humidity / Temperature</H3>");
client.println("<pre>");
client.print("Humidity (%)         : ");
client.println((float)humi, 2);
client.print("Temperature (°C)  : ");
client.println((float)temp, 2);
client.print("Temperature (°F)  : ");
client.println(Fahrenheit(temp), 2);
client.print("Temperature (°K)  : ");
client.println(Kelvin(temp), 2);
client.println("</pre>");
client.println("<H3>www.elec-cafe.com</H3>");
client.print("</body>\n</html>");
delay(DHT11_RETRY_DELAY); //delay for reread
}
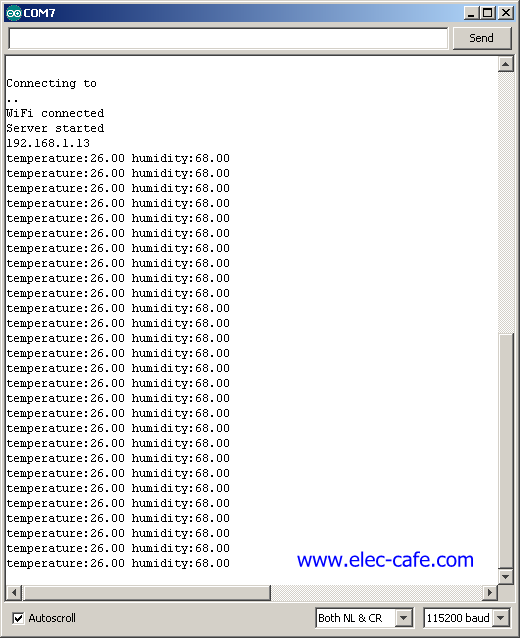
Step 4: Serial monitor
Check ip address ESP8266 Module with Serial monitor.
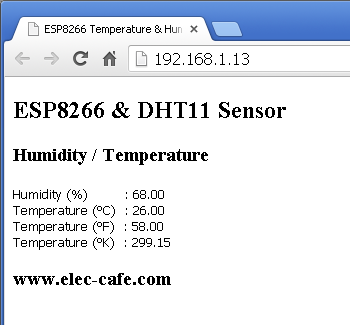
Step 5: Web Monitor
Open your Internet browser by ip address to display temperature and humidity information
(webpage to Auto Refresh 5 Sec.)